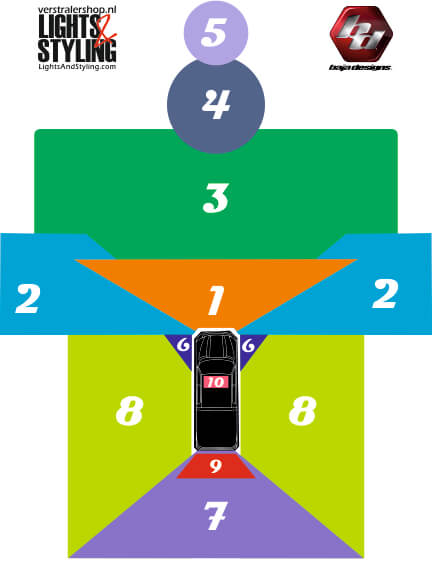
These zones have been designed by Baja Designs: The Scientists of Lighting.
Zone 1 - Dust/Fog: This zone illuminates the area directly in front of the vehicle. Mounting these lights low on the bumper eliminates glare from dust and fog.
Zone 2 - Cornering: This zone provides cornering light which is necessary to drive comfortably at speed. By toeing these lights out 10°-15°a smooth field of light is achieved, eliminating the feeling of tunnel vision.
Zone 3 - Driving Combo: This zone is your primary driving light. These lights are mounted in the middle of the front bumper to avoid glare off of the hood or from dust and fog in front of the vehicle.
Zone 4 - Spot: This zone is your first level of long distance lighting. Lights intended for this zone will give you the distance needed to travel at speed. Combined with zone two lighting, a smooth transition is achieved creating less stress on your eyes.
Zone 5 - High Speed Spot: This zone is necessary for triple digit speeds or wanting to see way down the road. This is the only forward projection pattern we recommend mounting along your roofline.
Zone 6 - Dome Lighting: This zone is used for wheel well lighting. This light is perfect for truck, jeep, buggy and UTV applications.
Zone 7 - Backup Lighting: This zone illuminates the area directly behind the rear of the vehicle. It is recommended that these lights be mounted on your rear bumper or cargo rack.
Zone 8 - Scene: Excellent work light or “scene light” with an extremely smooth 60° pattern. This pattern is not suitable for forward projection applications.
Zone 9 - Break / Signal Lighting: This zone illuminates the area directly behind the rear of the vehicle and has the purpose to increase visibility when breaking or driving in the dust. Sometimes comes with built in backup/scene lighting and strobe flashlights
Zone 10 - Flash / Strobe Lighting: This zone signals vehicles in front or in back of you for their awareness.


 English
 Nederlands
 Deutsch
 Svenska